Total cost of ownership
| Item | Price | Description |
|---|---|---|
| Linode nanode | $5/mo | 1 CPU, 1 GB Ram, 25 GB SSD |
| Managed Backups | $2/mo | Optional backup service |
| Cloudflare Domain | ~$20/yr | Any DNS service will do… |
| AWS S3 Backup | ~$2-5/mo | Optional S3 backup for redundancy |
| =================== | ======== | =================================== |
| Total | ~$13/mo | $9/mo w/o S3 cost estimate |
You don’t need a super powerful server to get stared, and the backups are optional. You could probably get by just fine with the Linode managed service.
Why roll your own PDS?
It’s what Bluesky is all about..
Sure you could sign up on their servers and use the service just fine, but it’s cool to engage with the AT protocol in the way it was meant to be.
P.S. You can get a few friends together to split admins duties or the cost to get the most bang for your buck from your node. Have fun with it!
You own your data
- Your data isn’t sitting on a company’s servers to be sold as AGI training tokens. Instead it’ll just be scraped from your server…
- We might see more apps start adopting the AT protocol, so you’d have freedom to take your data wherever you want.
Launch your server
1. Login or create an account with Linode
- You don’t have to use Linode, but for something this simple I think it’s a bit easier than other alternatives like GCP or AWS where there’s arguably too many features.
- It also has nice SSO with Github.
2. Create a Firewall ⚠️🔥️ Very Important‼️
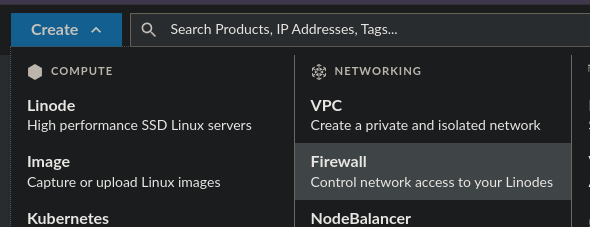
- Don’t leave your 🖥️ unlocked!
- You also need to allow for the right kind of traffic -> HTTP(S)

- Allow 80 & 443 for HTTP(S)
- Setup SSH on the standard port (22) with the source of your home IP.
- Please don’t skip this step 🙏️
- This means that only computers on your network can dial out to the server.
- If you’re working with other admins, then you’ll need to have their IPs listed here as well.
curl icanhazip.comto get your IP
3. Create a nanode
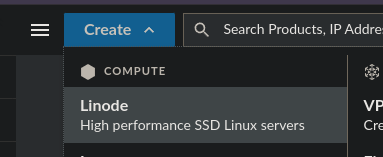
- Based the docs, a nanode will do. See “Server Recommendations”.
- Also note, that you can handle 1 - 20 users with a nanode, so another reason to get some of your friends involved to spread out the cost.
Server Options
- Select Shared CPU > Nanode 1 GB
- Select Ubuntu 22.04 LTS
- Other Supported Distros:
- Ubuntu 20.04 or 23.10 LTS (23.10 Not available on Linode)
- Debian 11 & 12
- Other Supported Distros:
- Name it something fun
Security
- Create a super secret root password
- I’d recommend making up something pretty gnarly and opting for logging in with your key.
- Here’s a password generator
- You can always save your password in a password manager if you think you’ll forget it, and worst case it can be changed in your Linode console.
- I’d recommend making up something pretty gnarly and opting for logging in with your key.
- (Optional) Add an SSH Key.
- You’ll thank yourself later for this…
- You can always
ssh-copy-id root@your-ipin the future to add your key or add keys from your other computers
- Select the firewall you created earlier
- (Optional) Add the “Backups” add-on. It’s $2 a month and totally worth it in my opinion.
You’re done with the server setup! Click “Create Linode” and let’s setup a domain while that’s being provisioned.
Setting up your domain
If it’s just you on the PDS server, then I’d consider just buying the domain you’d like to use as your handle to save some money. I made this mistake and had to buy two-separate domains. One for the server and one for my handle.
Domain registrars
- Cloudflare
- GoDaddy
- Name
- https://www.namecheap.com/
- Plenty more…
Domain Setup:
Here are the instructions on the Github README.
Configure DNS for your domain
From your DNS provider’s control panel, set up a domain with records pointing to your server.
| Name | Type | Value | TTL |
|---|---|---|---|
example.com | A | 12.34.56.78 | 600 |
*.example.com | A | 12.34.56.78 | 600 |
Note:
- Replace
example.comwith your domain name. - Replace
12.34.56.78with your server’s IP address. - Some providers may use the
@symbol to represent the root of your domain. - The wildcard record is required when allowing users to create new accounts on your PDS.
- The TTL can be anything but 600 (10 minutes) is reasonable
Check that DNS is working as expected
Use a service like DNS Checker to verify that you can resolve domain names.
Installing the PDS Containers on your computer
It’s best practice to use a separate user than root for running your application.
Here’s the steps for creating a new user
adduser pdsusermod -aG sudo pdssu - pds
Install Script
- Download the install script
curl https://raw.githubusercontent.com/bluesky-social/pds/main/installer.sh >installer.sh
- Run the script -
sudo bash installer.sh
Validating you can access the pds server
- Github README Section
- Visit
https://your-domain.com/xrpc/_healthand you should see
{"version":"0.2.2-beta.2"}
- Check websocket setup using wsdump
wsdump "wss://your-domain.com/xrpc/com.atproto.sync.subscribeRepos?cursor=0"
Setting up SFTP Email
Resend or SendGrid are recommended in the README here
Example pds.env config:
PDS_EMAIL_SMTP_URL=smtps://resend:<your api key here>@smtp.resend.com:465/
PDS_EMAIL_FROM_ADDRESS=[email protected]
Setting up accounts
Instructions on creating an account
- SSH into your pds server
sudo pdsadmin account create- If inviting others
sudo pdsadmin create-invite-code
How to login to Bluesky with your account
Custom usernames
- If you want to use your domain name as your handle instead of user.domain.com, you can navigate to your account settings and click on the Handle settings.
- From there you can set this up with your domain DNS settings.
Backup setup
I’ve setup a backup to S3 via duplicity
Dependencies:
- duplicity
- AWS CLI
- Make sure to setup authentication via
aws configure
- Make sure to setup authentication via
- You have a GPG Key setup
Put this in your /etc/cron.daily directory to run daily.
#!/bin/bash

SOURCE_DIR=/pds

BACKUP_DEST=boto3+s3://your-bucket

export PASSPHRASE="your-password"

GPG_KEY_ID="YOUR_GPG_KEY_ID"

DUPLICITY_OPTIONS="--verbosity info --encrypt-key $GPG_KEY_ID"

duplicity $DUPLICITY_OPTIONS "$SOURCE_DIR" "$BACKUP_DEST"

duplicity remove-older-than 30D --force "$BACKUP_DEST"

# Log the backup process
LOG_FILE="/var/log/duplicity-backup.log"
echo "Backup run on $(date)" >> "$LOG_FILE"

# Check for errors
if [ $? -ne 0 ]; then
  echo "Backup failed on $(date)" >> "$LOG_FILE"
fi

exit 0
Update Setup & Maintenance
Another quality of life script that I put in my /etc/cron.daily to make sure my system is up to date.
#!/bin/bash

# update system
echo "Updating packages:"
sudo apt-get upgrade -y

# update pds
echo "Updating pds:"
sudo pdsadmin update
Make sure that your files in your cron directory are executable. For example ch mod +x update_pds.sh
Feel free to shoot me a message if you have any questions @dancccskooma.social on Bluesky.